
.jpeg "How to Prepare All Over Print Designs for Cut and Sew (Seams, Panels, Sizes)")
All-over-print cut and sew is not the same as placing a graphic on a blank shirt. The fabric is printed flat as a panel, then cut and sewn into a garment. Every design decision you make at the file stage becomes a physical seam or a cut edge later. Getting this right before you upload saves rounds of reprints.
Because the human body does not scale proportionally from XS to 4XL. A design that wraps correctly around a medium-sized torso will stretch, compress, or tile incorrectly on a 3XL if you simply enlarge the same file.
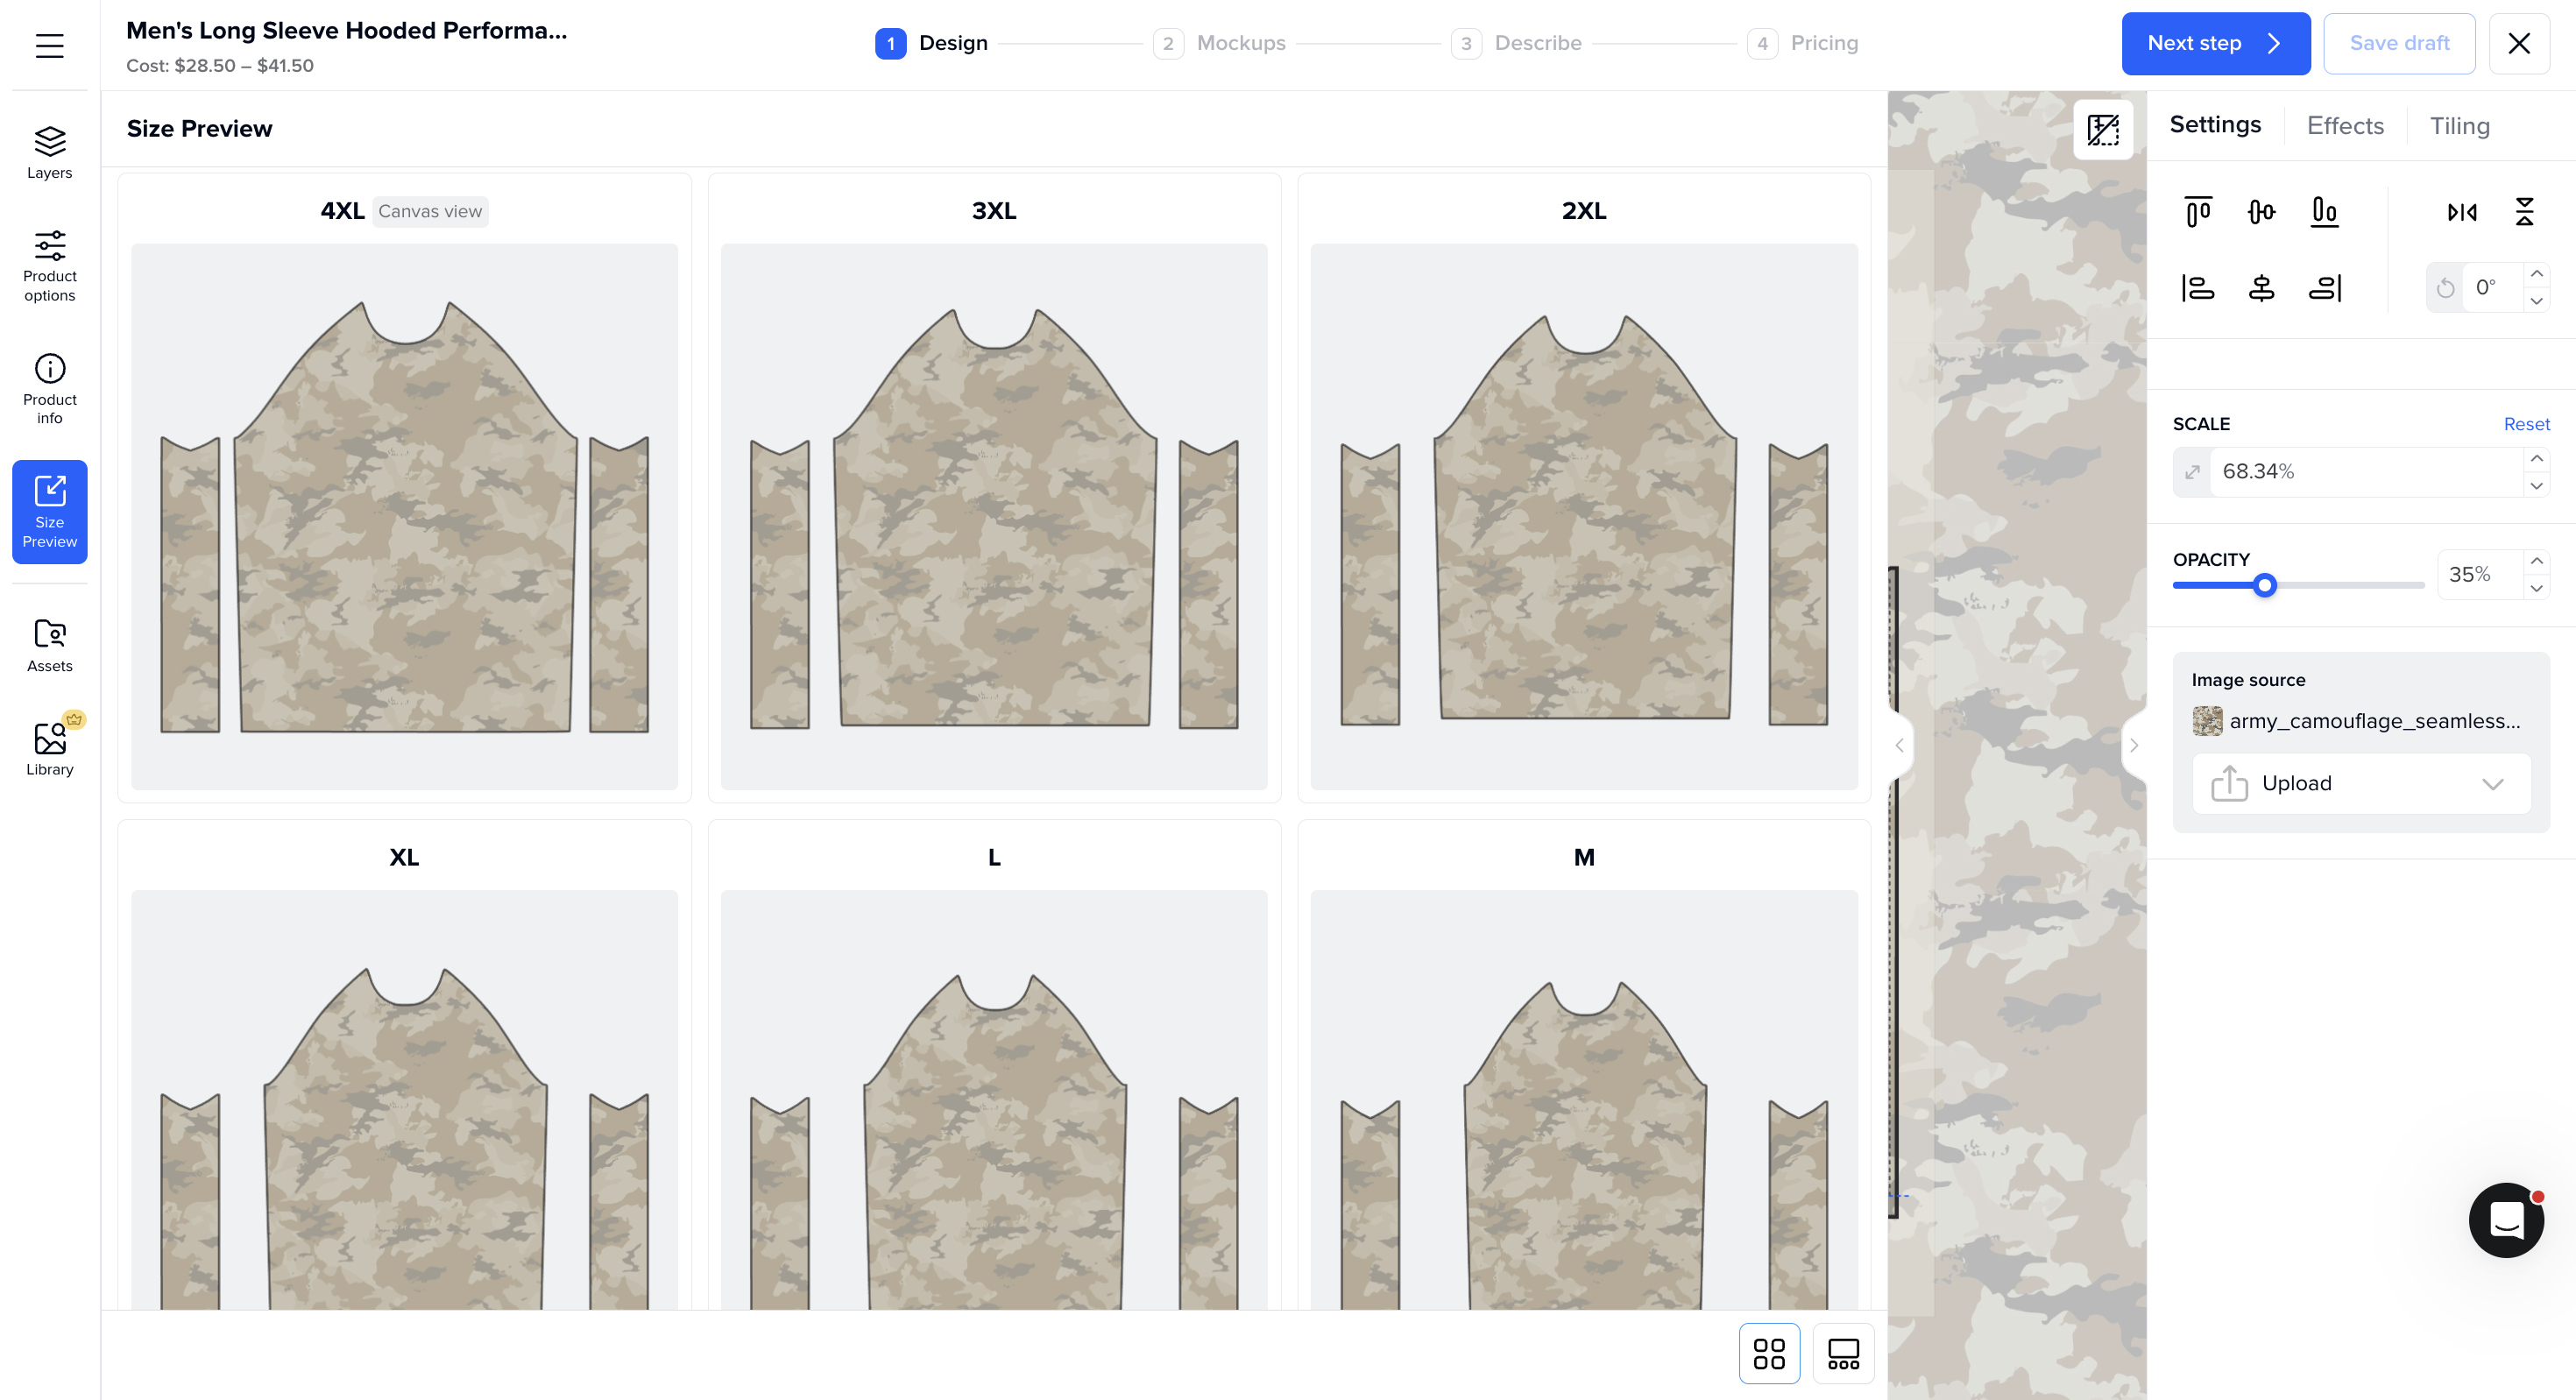
The front panel of an XL hoodie is physically wider and taller than the front panel of a medium. If you print the same file and scale it up to fit, any pattern element that was meant to land on the chest moves upward, any horizontal stripe widens, and seam positions shift relative to the design. The result looks wrong on the body, even if the print itself is technically clean.
The correct approach is to build the design so that key visual elements (a centered graphic, a stripe, a color block boundary) are anchored relative to the panel dimensions of each size. Most professional AOP templates provide a separate artboard or layer group per size for exactly this reason. It is more file work upfront, but it is the only way to guarantee the garment looks intentional across the size run.
This is where most first-time AOP sellers run into trouble. When two panels are sewn together, the sewing machine takes a seam allowance — typically 5 to 10 mm of fabric on each side — and folds it inward. Whatever is printed in that margin disappears inside the seam.
If your design has a hard edge (a color block boundary, a stripe, a geometric line) that lands exactly at the sewing line, two things can go wrong. First, the edge gets consumed by the seam allowance, so part of your design simply disappears into the seam. Second, small production tolerances mean the cut line shifts slightly between units, so the edge position is not perfectly repeatable.
The fix is bleed: extend the design at least 5 mm (preferably 10 mm) beyond the cut line on every edge. If the front panel has a gradient that fades to a dark color at the side seam, carry that dark color 10 mm past the cut line. When the fabric is sewn, the transition is hidden in the seam and the visual reads cleanly on the outside.
One thing bleed cannot do, and nothing else can either, is make a stripe or pattern continue from one panel onto an adjacent one without a visible offset. The front panel is flat while a sleeve is a tube, and panel proportions change with every size, so an alignment drawn for a medium would already be wrong on a large. Cross-seam matching is not how AOP garments are designed; the craft is choosing artwork that reads well wherever the seams land.
Read the fine print on any large POD platform's AOP product pages and you will find a disclaimer roughly stating that exact placement and pattern matching across seams cannot be guaranteed. This is honest, and it is worth understanding why.
Most POD platforms print panels from a single large file and then cut them using automated cutters. Small variations in how the fabric feeds through the printer, or how the cut file is positioned on the printed sheet, shift the panels by a few millimeters relative to each other. For an abstract print or a scattered pattern, a 3 mm shift is invisible. For a horizontal stripe that is supposed to continue from the front to the back panel, a 3 mm shift is obvious.
The platforms are not being evasive. They are describing a real physical constraint of their production process. The practical answer is to design for it: choose artwork that is tolerant of offsets at the seams (abstract, scattered, organic shapes) rather than patterns that depend on lining up across panels.
Specialized cut and sew tooling helps where software actually can: panels are generated with each size's own dimensions and seam allowances already accounted for before the file goes to print.
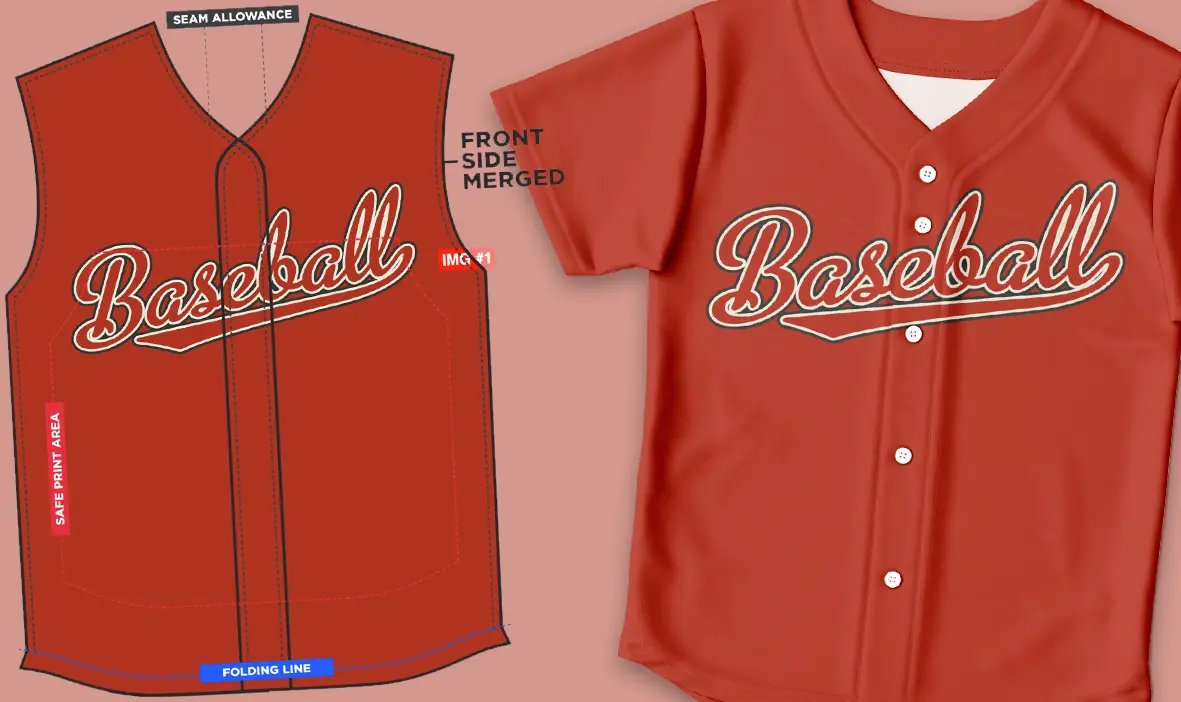
Subliminator's product creator, for example, handles the overlapping front panel problem on baseball jerseys and button-down shirts in software, so the panels are generated with the correct offsets rather than leaving the alignment to chance at the cutting stage. The pocket on a hoodie is matched to the corresponding position on the front panel at the file level, not approximated after the fact.
For sublimation printing on fabric, 150 dpi at the final print size is a practical minimum. 300 dpi is comfortable; anything above that does not improve visible output on fabric because the weave texture becomes the limiting factor, not the print resolution.
The mistake to avoid is working at 300 dpi at a small canvas and then scaling up. If your artboard is 20 cm wide at 300 dpi and the front panel of an XL hoodie is 60 cm wide, you are effectively printing at 100 dpi. Work at the actual panel dimensions from the start, or use vector elements for any hard edges and photographic or textured elements at true 150 dpi or above at final size.
File format: export as TIFF or high-quality PNG. JPEG compression introduces artifacts that are invisible on screen but visible on fabric, particularly in smooth gradients.
A DTG placement print is a rectangular graphic placed on a fixed position of a pre-sewn blank. The file does not need to account for seams because it never crosses one. It does not need to account for size scaling because the blank's print area does not change much between sizes. And it is typically 30 to 40 cm wide — a fraction of the total panel area.
An AOP cut and sew file covers the entire panel surface of a flat piece of fabric before it becomes a garment. The file must account for seam allowances on all edges and for size-specific panel dimensions. The design intent is also fundamentally different: AOP is usually about wrapping color, pattern, or imagery around the entire garment, which requires thinking about the garment as a three-dimensional object even though you are working in two dimensions.
If you are transitioning from DTG to AOP, plan for a learning curve on the file preparation side. The printing technology (sublimation versus direct-to-garment inkjet) is a separate topic, but the file structure is different enough that existing placement files need to be rebuilt, not adapted.
One honest tradeoff worth stating: if you want a cotton-feel garment, sublimation-based AOP is the wrong tool. Sublimation bonds dye into polyester fibers. The fashion fleece option (20% cotton / 75% polyester / 5% spandex) gives a softer hand feel than pure performance polyester, but it is not the same as a 100% cotton tee. For a true cotton feel with a placed graphic, DTG is the right answer. For full-coverage print across the whole garment, cut and sew AOP is the right answer.
Yes, if you want the design to read correctly across sizes. Some platforms handle size scaling automatically, but automatic scaling does not reposition design elements relative to the body — it just enlarges the entire file. For anything with intentional graphic placement, build per-size files or use a product creator that handles the scaling logic for you.
5 mm covers most production tolerances for straightforward color fills. If your design has a hard geometric edge near a seam — a stripe, a color block boundary, a border — use 10 mm. More than 10 mm is rarely necessary and adds to file size without improving the result.
No. No production process or design tool makes a pattern continue exactly across the front and back seam: panel proportions change between sizes, so an alignment that worked on one size would be off on every other. For designs where an offset would be visible (horizontal stripes, grid patterns, continuous illustrations), choose an organic or scattered pattern style that absorbs the shifts instead.
sRGB. Sublimation printing uses a CMYK ink set, but the conversion from RGB to the printer's color profile happens in the RIP software on the production side. Delivering in sRGB gives the production system a clean, well-defined starting point. Avoid submitting files in CMYK or with embedded profiles that assume offset printing — sublimation has a different gamut and the conversion assumptions will be wrong.
Mockups are representations, not guarantees, on most platforms. Subliminator's mockups are generated to closely match the delivered physical product, but fabric texture, ambient lighting, and small production tolerances mean there will always be minor differences. The goal is that the mockup gives you an accurate read of how the design wraps and where pattern elements land — not a pixel-perfect preview of the finished garment.

E-commerce enthusiast & founder @ Subliminator.
